Installation [12/2019 - ]: Procedure
- INSTALL RADIO SETTING CONDENSER
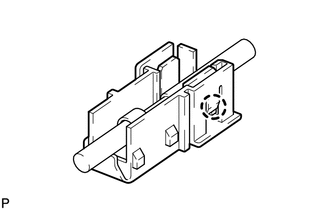
- Engage the claw to install a new terminal cover to the wire harness.NOTE:
- Make sure to hold the crimped side of the terminal when installing the wire harness to the terminal cover.
- Make sure not to bend the exposed wire when installing the wire harness to the terminal cover.
- Do not use excessive force when inserting the wire harness into the terminal cover.
- If the terminal cover has been deformed during installation, replace the terminal and terminal cover with new ones.
HINT:
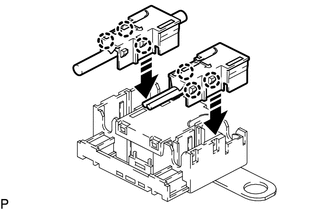
Use the same procedure for the other terminal cover.
- Engage the 6 claws to install 2 new terminal covers with wire harness to a new condenser as shown in the illustration.

Install in this Direction NOTE:- Do not use excessive force when inserting the terminal covers into the condenser.
- If a terminal cover has been deformed during installation, replace the terminal, terminal covers and condenser with new ones.
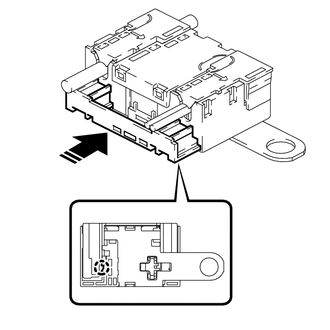
- Insert the cover as shown in the illustration and engage the claw.
Install in this Direction - Engage the clamp to temporarily install the new radio setting condenser with wire harness.
- Install the new radio setting condenser with the bolt.
- Engage the claw to install a new terminal cover to the wire harness.
- INSTALL DECK TRIM SIDE PANEL ASSEMBLY LH
Refer to PROCEDURE - Step 23 [12/2019 - 10/2022] , or refer to PROCEDURE - Step 21 [10/2022 - ]
- INSTALL ROPE HOOK
Refer to PROCEDURE - Step 24 [12/2019 - 10/2022] , or refer to PROCEDURE - Step 22 [10/2022 - ]
- INSTALL NO. 1 LUGGAGE COMPARTMENT TRIM HOOK
Refer to PROCEDURE - Step 25 [12/2019 - 10/2022] , or refer to PROCEDURE - Step 23 [10/2022 - ]
- INSTALL DECK TRIM POCKET COVER
Refer to PROCEDURE - Step 26 [12/2019 - 10/2022] , or refer to PROCEDURE - Step 24 [10/2022 - ]
- INSTALL NO. 2 DECK SIDE TRIM COVER
Refer to PROCEDURE - Step 28 [12/2019 - 10/2022] , or refer to PROCEDURE - Step 26 [10/2022 - ]
- INSTALL FRONT DECK SIDE TRIM COVER LH
Refer to PROCEDURE - Step 30 [12/2019 - 10/2022] , or refer to PROCEDURE - Step 28 [10/2022 - ]
- CONNECT REAR DOOR OPENING TRIM WEATHERSTRIP LH
Refer to PROCEDURE - Step 1
- INSTALL REAR DOOR SCUFF PLATE LH
Refer to PROCEDURE - Step 47 [12/2019 - 10/2022] , or refer to PROCEDURE - Step 45 [10/2022 - ]
- INSTALL REAR OUTER SEAT TRACK BRACKET COVER LH
Refer to PROCEDURE - Step 48 [12/2019 - 10/2022] , or refer to PROCEDURE - Step 46 [10/2022 - ]
- INSTALL REAR FLOOR FINISH PLATE
Refer to PROCEDURE - Step 65 [12/2019 - 10/2022] , or refer to PROCEDURE - Step 63 [10/2022 - ]
- INSTALL REAR NO. 2 SEAT ASSEMBLY
Refer to INSTALLATION [12/2019 - ]