Installation [12/2019 - 10/2022]: Procedure
- INSTALL ENGINE OIL LEVEL SENSOR
- Install the engine oil level sensor to the oil pan sub-assembly with the 2 nuts.
Torque: 10 N.m (102 kgf/cm, 7 ft.lbf)
- Install a new clip to the engine oil level sensor.
- Install the engine oil level sensor to the oil pan sub-assembly with the 2 nuts.
- INSTALL OIL STRAINER SUB-ASSEMBLY
Refer to PROCEDURE - Step 54
- INSTALL NO. 2 OIL PAN SUB-ASSEMBLY
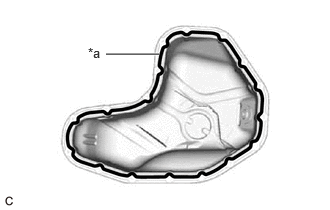
- Apply seal packing in a continuous line as shown in the illustration.
Seal Packing
Toyota Genuine Seal Packing Black, Three Bond 1207B or equivalent
Standard Seal Packing Diameter
3.0 to 4.0 mm (0.118 to 0.157 in.)
*a Seal Packing NOTE:- Remove any oil from the contact surface.
- Install the No. 2 oil pan sub-assembly within 3 minutes of applying seal packing.
- Do not start the engine for at least 2 hours after installation.
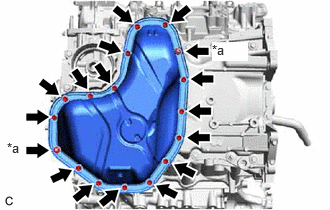
- Temporarily install the No. 2 oil pan sub-assembly with the 15 bolts and 2 nuts.
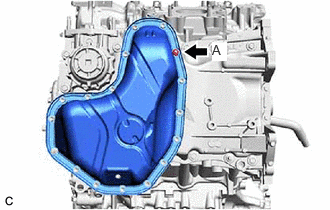
*a Nut - Tighten the nut (A).
Torque: 10 N.m (102 kgf/cm, 7 ft.lbf)
- Using SST, tighten the nut (B).
- SST: 09961-00950
*a Torque Wrench Fulcrum Length Specified tightening torque
Torque: 10 N.m (102 kgf/cm, 7 ft.lbf)
HINT:
- Calculate the torque wrench reading when changing the fulcrum length of the torque wrench.
Refer to PRECAUTION [12/2019 - 11/2023]
- When using SST (fulcrum length of 150 mm (5.91 in.)) + torque wrench (fulcrum length of 162 mm (6.38 in.)): 5.2 N.m (53 kgf/cm, 46 in.lbf)
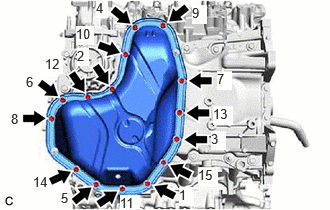
- Tighten the 15 bolts in several steps in the order shown in the illustration.
 Courtesy of © TOYOTA, LICENSE AGREEMENT TMS1002
Torque: 10 N.m (102 kgf/cm, 7 ft.lbf)
- Apply seal packing in a continuous line as shown in the illustration.
- ADD ENGINE OIL
Refer to PROCEDURE - Step 5 [12/2019 - 09/2020] , or refer to PROCEDURE - Step 5 [09/2020 - 10/2021] , or refer to PROCEDURE - Step 5 [10/2021 - 10/2022]
- INSPECT FOR ENGINE OIL LEAK
Refer to PROCEDURE - Step 6 [12/2019 - 09/2020] , or refer to PROCEDURE - Step 6 [09/2020 - 10/2021] , or refer to PROCEDURE - Step 6 [10/2021 - 10/2022]
- CHECK ENGINE OIL LEVEL
Refer to PROCEDURE - Step 1
- INSTALL REAR ENGINE UNDER COVER RH
Refer to PROCEDURE - Step 8 [12/2019 - 09/2020] , or refer to PROCEDURE - Step 8 [09/2020 - 10/2021] , or refer to PROCEDURE - Step 8 [10/2021 - 10/2022]