Installation [12/2019 - 11/2023]: Procedure
WARNING: This page is about a different variant/trim than selected.
- INSTALL HYBRID BATTERY THERMISTOR WARNING:
Be sure to wear insulated gloves and protective goggles.
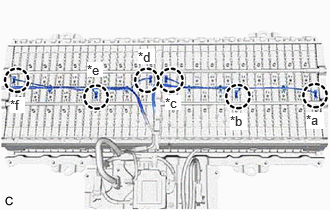
- Engage the 6 claws of the hybrid battery thermistor (sensor portions) to install the hybrid battery thermistor to the HV battery.
*a 1st Module from the HV Battery Junction Block Assembly Side
(Wire harness color: Pink)*b 11th Module from the HV Battery Junction Block Assembly Side
(Wire harness color: Gray)*c 20th Module from the HV Battery Junction Block Assembly Side
(Wire harness color: Sky blue)*d 22nd Module from the HV Battery Junction Block Assembly Side
(Wire harness color: Red)*e 29th Module from the HV Battery Junction Block Assembly Side
(Wire harness color: White)*f 40th Module from the HV Battery Junction Block Assembly Side
(Wire harness color: Blue)HINT:
Install each hybrid battery thermistor (sensor portion) to the appropriate location shown in the illustration.
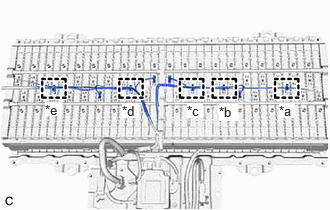
- Engage the 5 clamps in the locations shown in the illustration.
*a 5th Module from the HV Battery Junction Block Assembly Side *b 13th Module from the HV Battery Junction Block Assembly Side *c 17th Module from the HV Battery Junction Block Assembly Side *d 25th Module from the HV Battery Junction Block Assembly Side *e 35th Module from the HV Battery Junction Block Assembly Side - Connect the battery voltage sensor connector.
- Engage the 4 clamps.
- Engage the claw to install the No. 3 hybrid battery packing to the HV battery.
- Engage the 6 claws of the hybrid battery thermistor (sensor portions) to install the hybrid battery thermistor to the HV battery.
- INSTALL UPPER HV BATTERY COVER SUB-ASSEMBLY WARNING:
Be sure to wear insulated gloves and protective goggles.
- Install the upper HV battery cover sub-assembly to the HV battery with the 13 nuts.
Torque: 7.5 N.m (76 kgf/cm, 66 in.lbf)
- Engage the clamp.
- Install the upper HV battery cover sub-assembly to the HV battery with the 13 nuts.
- INSTALL NO. 6 HV BATTERY CARRIER BRACKET
Refer to PROCEDURE - Step 2
- INSTALL NO. 1 HYBRID BATTERY SHIELD SUB-ASSEMBLY
See step 2
- INSTALL HV BATTERY JUNCTION BLOCK ASSEMBLY
See step 1
- INSTALL NO. 10 HV BATTERY SHIELD PANEL
Refer to PROCEDURE - Step 6
- INSTALL HV BATTERY
Refer to INSTALLATION [12/2019 - 11/2023]