Removal [10/2022 - 11/2023]: Procedure
WARNING: This page is about a different variant/trim than selected.
- DRAIN COOLANT (for Inverter)
Refer to PROCEDURE - Step 1
- REMOVE HEADLIGHT ASSEMBLY
Refer to REMOVAL [09/2020 - 11/2023]
- REMOVE FRONT BUMPER ENERGY ABSORBER
Refer to PROCEDURE - Step 25
- REMOVE FRONT BUMPER REINFORCEMENT SUB-ASSEMBLY
Refer to PROCEDURE - Step 27
- REMOVE NO. 1 RADIATOR AIR GUIDE LH
Refer to PROCEDURE - Step 12
- REMOVE NO. 1 RADIATOR AIR GUIDE RH
Refer to PROCEDURE - Step 13
- REMOVE RADIATOR ASSEMBLY (for Inverter Coolant)
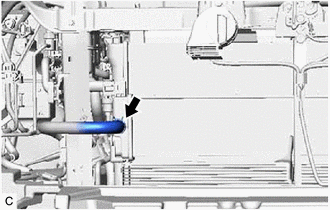
- Slide the clip and disconnect the No. 3 inverter cooling hose from the radiator assembly (for inverter coolant).NOTE:
- Put pieces of cloth into the pipes and disconnected hoses or cover the pipes and hoses with plastic bags to prevent foreign matter from entering the radiator assembly (for inverter coolant) and inverter cooling system.
- Do not apply excessive force to the No. 3 inverter cooling hose.
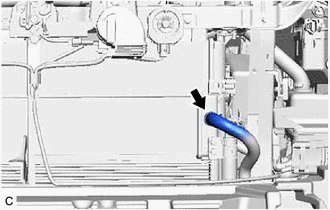
- Slide the clip and disconnect the No. 4 inverter cooling hose from the radiator assembly (for inverter coolant).NOTE:
- Put pieces of cloth into the pipes and disconnected hoses or cover the pipes and hoses with plastic bags to prevent foreign matter from entering the radiator assembly (for inverter coolant) and inverter cooling system.
- Do not apply excessive force to the No. 4 inverter cooling hose.
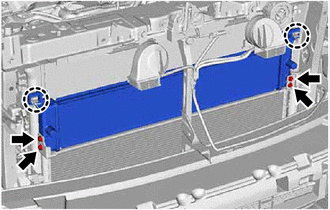
- Remove the 4 bolts.
- Disengage the 2 claws and remove the radiator assembly (for inverter coolant) from the radiator assembly.
- Slide the clip and disconnect the No. 3 inverter cooling hose from the radiator assembly (for inverter coolant).