Installation [12/2019 - ]: Procedure
WARNING: This page is about a different variant/trim than selected.
- INSTALL RADIATOR ASSEMBLY (for Inverter Coolant)
- Engage the 2 claws to install the radiator assembly (for inverter coolant) to the radiator assembly.NOTE:
Be careful not to damage the radiator assembly (for inverter coolant) or radiator assembly.
- Install the 4 bolts.
Torque: 9.0 N.m (92 kgf/cm, 80 in.lbf)
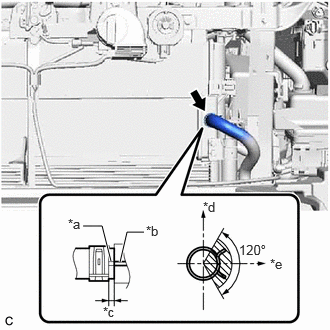
- Connect the No. 4 inverter cooling hose to the radiator assembly (for inverter coolant) and slide the clip to secure it.NOTE:
- To prevent foreign matter from entering the radiator assembly (for inverter coolant) and inverter cooling system, do not remove the pieces of cloth from the pipe and disconnected hose until installation.
- Make sure to align the alignment mark of the hose with the rib of the radiator assembly (for inverter coolant).
- Do not apply excessive force to the No. 4 inverter cooling hose.
*a Alignment Mark *b Rib *c 2 to 7 mm (0.0787 to 0.276 in.) *d Up *e LH Side HINT:
Make sure that the clip is positioned as shown in the illustration.
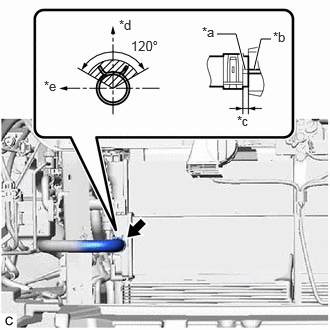
- Connect the No. 3 inverter cooling hose to the radiator assembly (for inverter coolant) and slide the clip to secure it.NOTE:
- To prevent foreign matter from entering the radiator assembly (for inverter coolant) and inverter cooling system, do not remove the pieces of cloth from the pipe and disconnected hose until installation.
- Make sure to align the alignment mark of the hose with the rib of the radiator assembly (for inverter coolant).
- Do not apply excessive force to the No. 3 inverter cooling hose.
*a Alignment Mark *b Rib *c 2 to 7 mm (0.0787 to 0.276 in.) *d Up *e RH Side HINT:
Make sure that the clip is positioned as shown in the illustration.
- Engage the 2 claws to install the radiator assembly (for inverter coolant) to the radiator assembly.
- INSTALL NO. 1 RADIATOR AIR GUIDE RH
Refer to PROCEDURE - Step 12
- INSTALL NO. 1 RADIATOR AIR GUIDE LH
Refer to PROCEDURE - Step 13
- INSTALL FRONT BUMPER REINFORCEMENT SUB-ASSEMBLY
Refer to PROCEDURE - Step 4
- INSTALL FRONT BUMPER ENERGY ABSORBER
Refer to PROCEDURE - Step 6
- INSTALL HEADLIGHT ASSEMBLY
Refer to INSTALLATION [12/2019 - 09/2020] , or refer to INSTALLATION [09/2020 - ]
- ADD COOLANT (for Inverter)
Refer to PROCEDURE - Step 2
- INSPECT FOR COOLANT LEAK (for Inverter)
Refer to PROCEDURE - Step 1