Installation [12/2019 - ]: Procedure
- INSTALL LOWER RADIATOR SUPPORT
- Install the 2 lower radiator supports to the radiator assembly.
- INSTALL RADIATOR SUPPORT CUSHION
- Install the 2 radiator support cushions to the radiator assembly.
- INSTALL RADIATOR ASSEMBLY
- Engage the 2 guides.
- Engage the 2 claws to install the fan with motor assembly to the radiator assembly.NOTE:
Do not damage the radiator assembly when installing the fan with motor assembly.
- Install the radiator assembly with the fan with motor assembly to the vehicle body.NOTE:
Do not apply excessive force to the cooler condenser assembly or pipe when installing the radiator assembly with the fan with motor assembly.
- Engage the 2 guides.
- Engage the 2 claws to install the cooler condenser assembly to the radiator assembly.NOTE:
Make sure not to damage the cooler condenser assembly when installing the cooler condenser assembly.
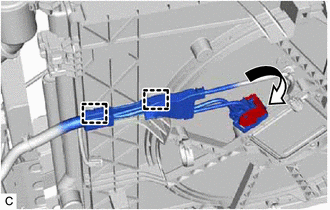
- Engage the 2 clamps to connect the wire harness to the fan with motor assembly.
- Connect the cooling fan motor connector and rotate the lever to lock it.NOTE:
- When connecting the cooling fan motor connector, make sure that the connecting parts of the cooling fan motor connector are free of dirt, water or other foreign matter.
- Be sure to securely connect the cooling fan motor connector.
- Engage the clamp to connect the wire harness to the fan with motor assembly.
- Connect the cooling fan motor connector.
- CONNECT NO. 5 INVERTER COOLING HOSE
- Engage the 3 clamps and connect the No. 5 inverter cooling hose to the fan with motor assembly.
- CONNECT NO. 4 INVERTER COOLING HOSE
- Engage the clamp and connect the No. 4 inverter cooling hose to the fan with motor assembly.
- CONNECT NO. 2 RADIATOR HOSE
- Connect the No. 2 radiator hose to the radiator assembly and slide the clip to secure it.
- Engage the clamp to connect the No. 2 radiator hose to the fan with motor assembly.
- CONNECT NO. 3 RADIATOR HOSE
- Connect the No. 3 radiator hose to the radiator assembly and slide the clip to secure it.
- Engage the clamp to connect the No. 1 radiator hose to the fan with motor assembly.
- CONNECT NO. 6 WATER BY-PASS HOSE
- Connect the No. 6 water by-pass hose to the radiator assembly.
- CONNECT NO. 4 WATER BY-PASS HOSE
- Connect the No. 4 water by-pass hose to the radiator assembly and slide the clip to secure it.
- INSTALL NO. 2 RADIATOR AIR GUIDE
- Install the No. 2 radiator air guide.
- Install the hood lock control cable assembly to the No. 2 radiator air guide.
- INSTALL UPPER RADIATOR SUPPORT SUB-ASSEMBLY
- Engage the 3 claws.
- Install the upper radiator support sub-assembly with the 5 bolts.
Torque: 12.5 N.m (127 kgf/cm, 9 ft.lbf)
- Engage the clamp to connect the hood lock control cable assembly to the upper radiator support sub-assembly.
- Install the inlet hose with the bolt.
Torque: 5.5 N.m (56 kgf/cm, 49 in.lbf)
- Connect the 2 horn connectors and vehicle approaching speaker assembly connector.
- INSTALL NO. 1 RADIATOR AIR GUIDE RH
- Engage the guide and claw.
- Install the No. 1 radiator air guide RH with the clip.
- INSTALL NO. 1 RADIATOR AIR GUIDE LH
- Engage the guide and claw.
- Install the No. 1 radiator air guide LH with the clip.
- INSTALL INLET AIR CLEANER ASSEMBLY
Refer to PROCEDURE - Step 20 [12/2019 - 11/2023] , or refer to PROCEDURE - Step 20 [11/2023 - ]
- INSTALL HOOD LOCK ASSEMBLY
Refer to PROCEDURE - Step 6 [12/2019 - 09/2020] , or refer to PROCEDURE - Step 6 [09/2020 - ]
- INSTALL RADIATOR SHUTTER SUB-ASSEMBLY
Refer to INSTALLATION [12/2019 - 09/2020] , or refer to INSTALLATION [09/2020 - 10/2021] , or refer to INSTALLATION [10/2021 - ]
- INSTALL FRONT BUMPER REINFORCEMENT SUB-ASSEMBLY
Refer to PROCEDURE - Step 4
- INSTALL FRONT BUMPER ENERGY ABSORBER
Refer to PROCEDURE - Step 6
- INSTALL HEADLIGHT ASSEMBLY
Refer to INSTALLATION [12/2019 - 09/2020] , or refer to INSTALLATION [09/2020 - ]
- ADD ENGINE COOLANT (for Engine)
Refer to PROCEDURE - Step 2
- INSPECT FOR COOLANT LEAK (for Engine)
Refer to PROCEDURE - Step 1
- INSTALL NO. 2 ENGINE UNDER COVER ASSEMBLY
Refer to PROCEDURE - Step 62 [12/2019 - 10/2022] , or refer to PROCEDURE - Step 62 [10/2022 - 11/2023] , or refer to PROCEDURE - Step 60 [11/2023 - ]
- INSTALL NO. 1 ENGINE UNDER COVER
Refer to PROCEDURE - Step 63 [12/2019 - 10/2022] , or refer to PROCEDURE - Step 63 [10/2022 - 11/2023] , or refer to PROCEDURE - Step 61 [11/2023 - ]
- INSTALL FRONT WHEEL OPENING EXTENSION PAD RH
Refer to PROCEDURE - Step 65 [12/2019 - 10/2022] , or refer to PROCEDURE - Step 65 [10/2022 - 11/2023] , or refer to PROCEDURE - Step 63 [11/2023 - ]
- INSTALL FRONT WHEEL OPENING EXTENSION PAD LH
Refer to PROCEDURE - Step 64 [12/2019 - 10/2022] , or refer to PROCEDURE - Step 64 [10/2022 - 11/2023] , or refer to PROCEDURE - Step 62 [11/2023 - ]