Removal [12/2019 - 10/2022]: Procedure
- PRECAUTION NOTE:
After turning the ignition switch off, waiting time may be required before disconnecting the cable from the negative (-) battery terminal. Therefore, make sure to read the disconnecting the cable from the negative (-) battery terminal notices before proceeding with work.
- DISCONNECT CABLE FROM NEGATIVE AUXILIARY BATTERY TERMINAL WARNING:
Wait at least 90 seconds after disconnecting the cable from the negative (-) auxiliary battery terminal to disable the SRS system.
NOTE:When disconnecting the cable, some systems need to be initialized after the cable is reconnected.
Refer to INITIALIZATION [12/2019 - 09/2020] , or refer to INITIALIZATION [09/2020 - 10/2021] , or refer to INITIALIZATION [10/2021 - 10/2022]
- REMOVE BATTERY SERVICE HOLE COVER (for HV Model)
Refer to PROCEDURE - Step 1
- REMOVE FRONT DOOR SCUFF PLATE
Refer to PROCEDURE - Step 9
- DISCONNECT FRONT DOOR OPENING TRIM WEATHERSTRIP
- Disconnect the front door opening trim weatherstrip.
- REMOVE REAR OUTER SEAT TRACK BRACKET COVER
Refer to PROCEDURE - Step 13
- REMOVE REAR DOOR SCUFF PLATE
Refer to PROCEDURE - Step 14
- DISCONNECT REAR DOOR OPENING TRIM WEATHERSTRIP
- Disconnect the rear door opening trim weatherstrip.
- REMOVE LAP BELT OUTER ANCHOR COVER
- DISCONNECT FRONT SEAT OUTER BELT ASSEMBLY
- REMOVE LOWER CENTER PILLAR GARNISH
Refer to PROCEDURE - Step 18
- REMOVE CENTER PILLAR GARNISH ASSEMBLY
Refer to PROCEDURE - Step 19
- REMOVE FRONT SEAT OUTER BELT ASSEMBLY
- Remove the nut and disconnect the shoulder anchor of the front seat outer belt assembly.
- for LH Side:
- Remove the bolt.
- Disengage the 2 guides to remove the front seat outer belt assembly.
- for RH Side:
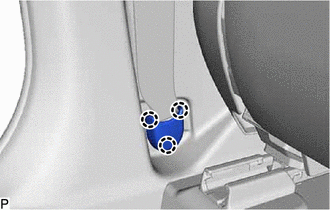
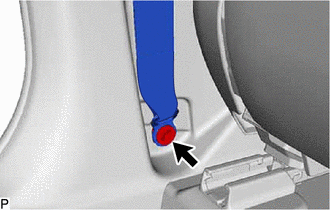
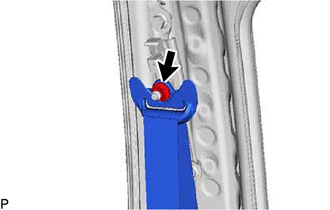
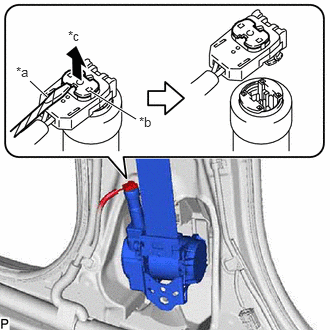
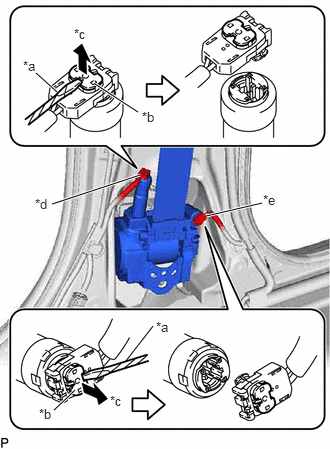
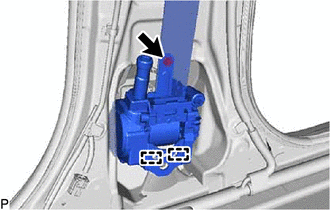
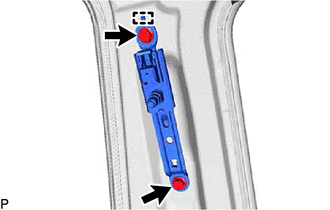
- Using a screwdriver, pull out the locking button as shown in the illustration to release the lock and disconnect the pretensioner connector.
HINT:
Tape the screwdriver tip before use.
*a Protective Tape *b Locking Button *c Release *d Pretensioner Connector *e Selectable Force Limiter Connector - Using a screwdriver, pull out the locking button as shown in the illustration to release the lock and disconnect the selectable force limiter connector.
HINT:
Tape the screwdriver tip before use.
- Using a screwdriver, pull out the locking button as shown in the illustration to release the lock and disconnect the pretensioner connector.
- Remove the bolt.
- Disengage the 2 guides to remove the front seat outer belt assembly.
- Remove the nut and disconnect the shoulder anchor of the front seat outer belt assembly.
- REMOVE FRONT SHOULDER BELT ANCHOR ADJUSTER ASSEMBLY
HINT:
Perform this procedure only when replacement of the front shoulder belt anchor adjuster assembly is necessary.