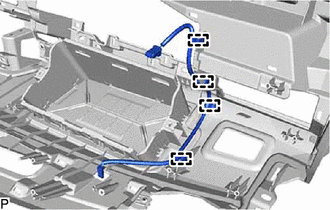
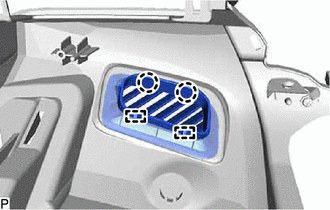
- INSTALL NO. 3 INSTRUMENT PANEL WIRE
- Engage the 4 clamps to install the No. 3 instrument panel wire.
 Courtesy of © TOYOTA, LICENSE AGREEMENT TMS1002 Courtesy of © TOYOTA, LICENSE AGREEMENT TMS1002
|
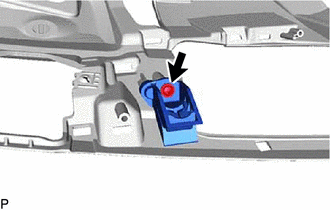
- INSTALL NO. 1 INSTRUMENT PANEL PIN
- for LH Side:
- Install the No. 1 instrument panel pin with the screw <B> or <D>.
 Courtesy of © TOYOTA, LICENSE AGREEMENT TMS1002 Courtesy of © TOYOTA, LICENSE AGREEMENT TMS1002
|
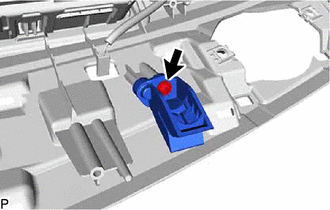
- for RH Side:
- Install the No. 1 instrument panel pin with the screw <B> or <D>.
 Courtesy of © TOYOTA, LICENSE AGREEMENT TMS1002 Courtesy of © TOYOTA, LICENSE AGREEMENT TMS1002
|
- INSTALL INSTRUMENT PANEL PASSENGER AIRBAG ASSEMBLY
Refer to PROCEDURE - Step 2 [12/2019 - 11/2023]
, or refer to PROCEDURE - Step 2 [11/2023 - ]
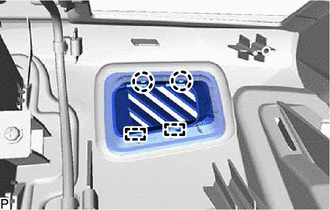
- INSTALL NO. 2 METER HOOD RETAINER
- Install the No. 2 meter hood retainer with the screw <B> or <D>.
 Courtesy of © TOYOTA, LICENSE AGREEMENT TMS1002 Courtesy of © TOYOTA, LICENSE AGREEMENT TMS1002
|
- INSTALL NO. 1 METER HOOD RETAINER
- Install the No. 1 meter hood retainer with the screw <B> or <D>.
 Courtesy of © TOYOTA, LICENSE AGREEMENT TMS1002 Courtesy of © TOYOTA, LICENSE AGREEMENT TMS1002
|
- INSTALL NO. 2 SIDE DEFROSTER NOZZLE
- Engage the 2 claws and 2 guides to install the No. 2 side defroster nozzle.
 Courtesy of © TOYOTA, LICENSE AGREEMENT TMS1002 Courtesy of © TOYOTA, LICENSE AGREEMENT TMS1002
|
- INSTALL NO. 1 SIDE DEFROSTER NOZZLE
- Engage the 2 claws and 2 guides to install the No. 1 side defroster nozzle.
 Courtesy of © TOYOTA, LICENSE AGREEMENT TMS1002 Courtesy of © TOYOTA, LICENSE AGREEMENT TMS1002
|
- INSTALL NAVIGATION ANTENNA ASSEMBLY WITH BRACKET (w/ Navigation Antenna)
w/o Manual (SOS) Switch: Refer to PROCEDURE - Step 3
- INSTALL TELEPHONE AND GPS ANTENNA ASSEMBLY WITH BRACKET (w/ Navigation Antenna)
w/ Manual (SOS) Switch: Refer to PROCEDURE - Step 3
- INSTALL ANTENNA CORD SUB-ASSEMBLY
Refer to PROCEDURE - Step 6
- INSTALL NO. 2 ANTENNA CORD SUB-ASSEMBLY (w/ Navigation Antenna)
Refer to PROCEDURE - Step 7
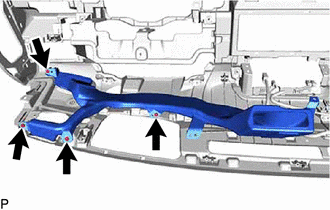
- INSTALL NO. 1 SIDE DEFROSTER NOZZLE DUCT
- Install the No. 1 side defroster nozzle duct with the 4 screws <B> or <D>.
 Courtesy of © TOYOTA, LICENSE AGREEMENT TMS1002 Courtesy of © TOYOTA, LICENSE AGREEMENT TMS1002
|
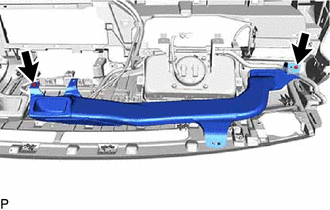
- INSTALL NO. 2 SIDE DEFROSTER NOZZLE DUCT
- Install the No. 2 side defroster nozzle duct with the 2 screws <B> or <D>.
 Courtesy of © TOYOTA, LICENSE AGREEMENT TMS1002 Courtesy of © TOYOTA, LICENSE AGREEMENT TMS1002
|
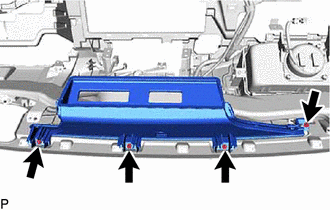
- INSTALL DEFROSTER NOZZLE ASSEMBLY
- Install the defroster nozzle assembly with the 4 screws <B> or <D>.
 Courtesy of © TOYOTA, LICENSE AGREEMENT TMS1002 Courtesy of © TOYOTA, LICENSE AGREEMENT TMS1002
|
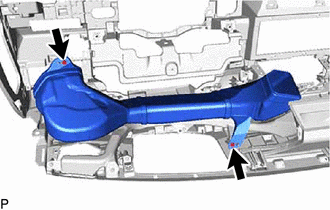
- INSTALL NO. 1 HEATER TO REGISTER DUCT
- Install the No. 1 heater to register duct with the 2 screws <B> or <D>.
 Courtesy of © TOYOTA, LICENSE AGREEMENT TMS1002 Courtesy of © TOYOTA, LICENSE AGREEMENT TMS1002
|
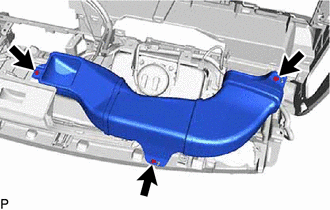
- INSTALL NO. 4 HEATER TO REGISTER DUCT
- Install the No. 4 heater to register duct with the 3 screws <B> or <D>.
 Courtesy of © TOYOTA, LICENSE AGREEMENT TMS1002 Courtesy of © TOYOTA, LICENSE AGREEMENT TMS1002
|