Removal [11/2023 - ]: Procedure
- PRECAUTION (w/ Kick Sensor) NOTE:
After turning the ignition switch off, waiting time may be required before disconnecting the cable from the negative (-) auxiliary battery terminal. Therefore, make sure to read the disconnecting the cable from the negative (-) auxiliary battery terminal notices before proceeding with work.
- REMOVE BATTERY SERVICE HOLE COVER (w/ Kick Sensor)
for HV Model:
Refer to PROCEDURE - Step 2
- DISCONNECT CABLE FROM NEGATIVE AUXILIARY BATTERY TERMINAL (w/ Kick Sensor)
for T24A-FTS:
Refer to PROCEDURE - Step 2
for A25A-FXS:
Refer to PROCEDURE - Step 3
- REMOVE REAR QUARTER PANEL MUDGUARD LH (w/ Mudguard)
See step 2
- REMOVE REAR QUARTER PANEL MUDGUARD RH (w/ Mudguard)
HINT:
Use the same procedure as for the LH side.
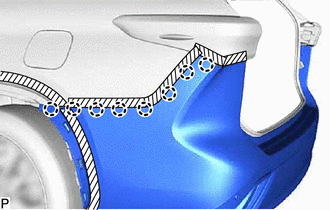
- DISCONNECT QUARTER PANEL WHEEL OPENING MOULDING LH
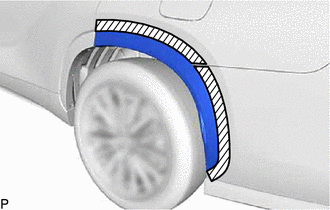
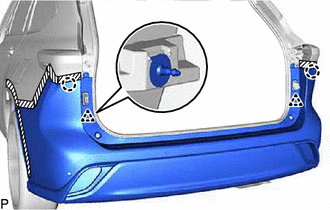
- Apply protective tape around the quarter panel wheel opening moulding LH as shown in the illustration.

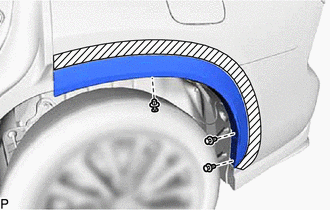
Protective Tape - Remove the 3 clips.
- Remove the screw.
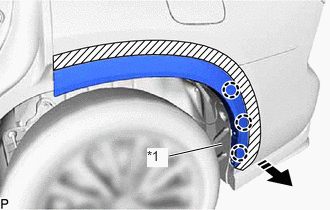
- While pulling the rear bumper assembly, insert a finger between the rear bumper side seal LH and rear bumper assembly and disengage the 3 claws as shown in the illustration.
*1 Rear Bumper Side Seal LH 
Remove in this Direction NOTE:- Do not apply excessive force when pulling back the rear bumper side seal LH.
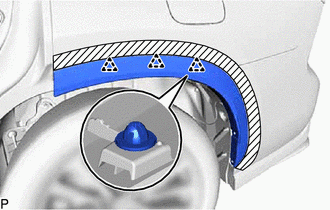
- To avoid damaging the claws, do not forcibly pull the quarter panel wheel opening moulding.
- Disengage the 3 clips to disconnect the quarter panel wheel opening moulding LH.
- Remove the 3 clips from the quarter panel wheel opening moulding LH.
- Apply protective tape around the quarter panel wheel opening moulding LH as shown in the illustration.
- DISCONNECT QUARTER PANEL WHEEL OPENING MOULDING RH
HINT:
Use the same procedure as for the LH side.
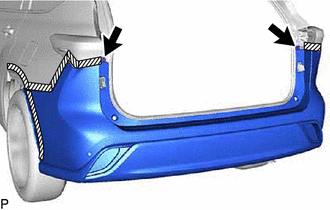
- REMOVE REAR COMBINATION LIGHT COVER LH
Refer to PROCEDURE - Step 1
- REMOVE REAR COMBINATION LIGHT COVER RH
HINT:
Use the same procedure as for the LH side.
- REMOVE REAR BUMPER ASSEMBLY (except Sport Package)
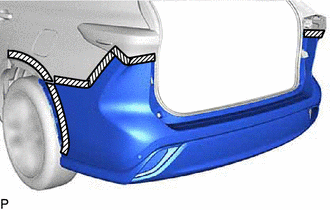
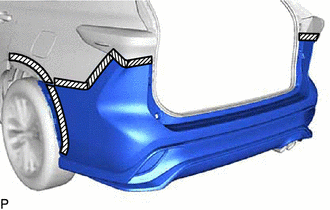
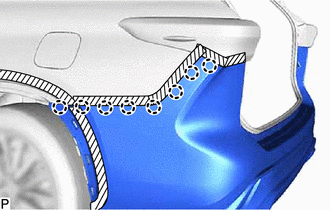
- Apply protective tape around the rear bumper assembly as shown in the illustration.
Protective Tape HINT:
Use the same procedure for the RH side and LH side.
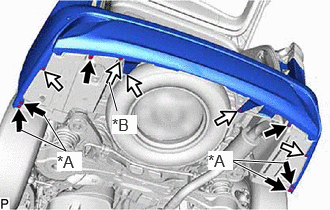
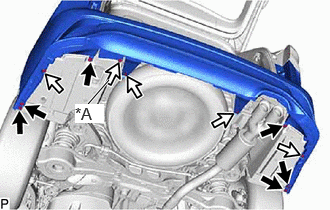
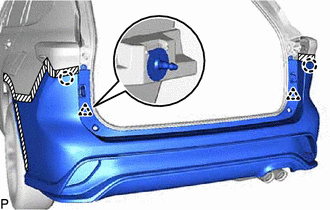
- Remove each screw.
*A w/o Mudguard *B w/o Towing Hitch 
Screw 
Clip - Remove each clip.
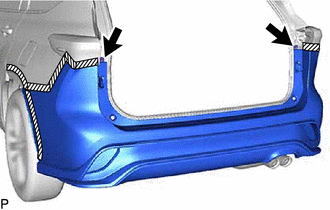
- Remove the 2 screws.
- Disengage the 8 claws.
HINT:
Use the same procedure for the RH side and LH side.
- Disengage the 2 claws and 2 clips to remove the rear bumper assembly.
- w/ Kick Sensor:
- Disconnect the connector.
- Apply protective tape around the rear bumper assembly as shown in the illustration.
- REMOVE REAR BUMPER ASSEMBLY (for Sport Package)
- Apply protective tape around the rear bumper assembly as shown in the illustration.
Protective Tape HINT:
Use the same procedure for the RH side and LH side.
- Remove the 6 screws.
*A w/o Towing Hitch Screw Clip - Remove each clip.
- Remove the 2 screws.
- Disengage the 8 claws.
HINT:
Use the same procedure for the RH side and LH side.
- Disengage the 2 claws and 2 clips to remove the rear bumper assembly.
- Apply protective tape around the rear bumper assembly as shown in the illustration.