Adjustment [12/2019 - ]: Procedure
- INSPECT BACK DOOR
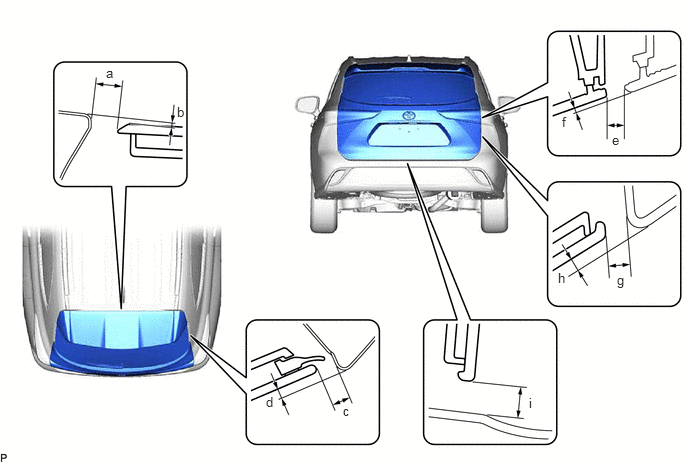
- Check that the clearance measurements of areas a through i are within each standard range.STANDARD CLEARANCE
Area Measurement Area Measurement a 6.15 to 10.15 mm (0.242 to 0.400 in.) b -0.35 to 3.65 mm (-0.0138 to 0.144 in.) c 4.05 to 9.05 mm (0.159 to 0.356 in.) d 0.95 to 5.95 mm (0.0374 to 0.234 in.) e 2.9 to 7.9 mm (0.114 to 0.311 in.) f -1.0 to 4.0 mm (-0.0394 to 0.158 in.) g 3.8 to 8.8 mm (0.150 to 0.346 in.) h 1.0 to 6.0 mm (0.0394 to 0.236 in.) i 5.8 to 10.8 mm (0.228 to 0.425 in.) - -
- Check that the clearance measurements of areas a through i are within each standard range.
- REMOVE DECK BOARD ASSEMBLY
Refer to PROCEDURE - Step 1 [12/2019 - 10/2022] , or refer to PROCEDURE - Step 1 [10/2022 - ]
- REMOVE NO. 3 DECK BOARD SUB-ASSEMBLY (w/o Woofer)
Refer to PROCEDURE - Step 2 [12/2019 - 10/2022] , or refer to PROCEDURE - Step 2 [10/2022 - ]
- REMOVE TONNEAU COVER ASSEMBLY (w/ Tonneau Cover)
Refer to PROCEDURE - Step 3 [12/2019 - 10/2022] , or refer to PROCEDURE - Step 3 [10/2022 - ]
- REMOVE BATTERY SERVICE HOLE COVER
Refer to PROCEDURE - Step 4 [12/2019 - 10/2022] , or refer to PROCEDURE - Step 4 [10/2022 - ]
- REMOVE REAR DECK FLOOR BOX
Refer to PROCEDURE - Step 5 [12/2019 - 10/2022] , or refer to PROCEDURE - Step 5 [10/2022 - ]
- REMOVE REAR FLOOR FINISH PLATE
Refer to PROCEDURE - Step 7 [12/2019 - 10/2022] , or refer to PROCEDURE - Step 7 [10/2022 - ]
- ADJUST BACK DOOR
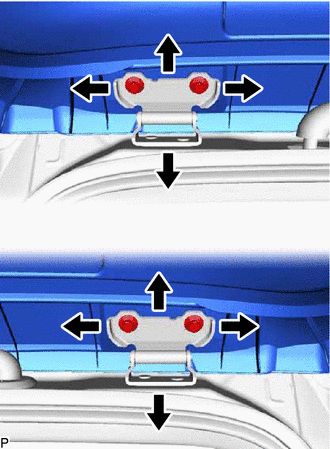
- Loosen the 4 hinge bolts on the back door and adjust the back door position.
- Tighten the 4 hinge bolts on the back door after adjustment.
Torque: 46 N.m (469 kgf/cm, 34 ft.lbf)
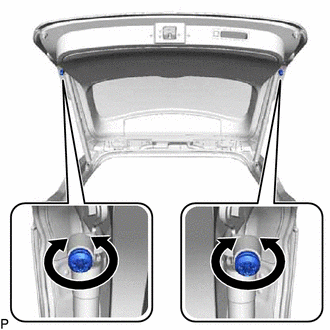
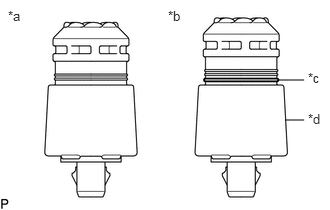
- Adjust the 2 back door upper stopper cushions to adjust the forward / rearward position of the back door.
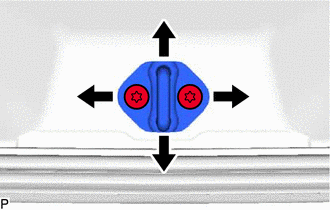
- Using a T40 "TORX" socket wrench, slightly loosen the 2 striker mounting screws.
- Using a brass bar and a hammer, hit the striker to adjust its position.
- Using a T40 "TORX" socket wrench, tighten the 2 striker mounting screws after adjustment.
Torque: 23 N.m (235 kgf/cm, 17 ft.lbf)
- Loosen the 4 hinge bolts on the back door and adjust the back door position.
- INSTALL REAR FLOOR FINISH PLATE
Refer to PROCEDURE - Step 65 [12/2019 - 10/2022] , or refer to PROCEDURE - Step 63 [10/2022 - ]
- INSTALL REAR DECK FLOOR BOX
Refer to PROCEDURE - Step 67 [12/2019 - 10/2022] , or refer to PROCEDURE - Step 65 [10/2022 - ]
- INSTALL BATTERY SERVICE HOLE COVER
Refer to PROCEDURE - Step 68 [12/2019 - 10/2022] , or refer to PROCEDURE - Step 66 [10/2022 - ]
- INSTALL TONNEAU COVER ASSEMBLY (w/ Tonneau Cover)
Refer to PROCEDURE - Step 69 [12/2019 - 10/2022] , or refer to PROCEDURE - Step 67 [10/2022 - ]
- INSTALL NO. 3 DECK BOARD SUB-ASSEMBLY (w/o Woofer)
Refer to PROCEDURE - Step 70 [12/2019 - 10/2022] , or refer to PROCEDURE - Step 68 [10/2022 - ]
- INSTALL DECK BOARD ASSEMBLY
Refer to PROCEDURE - Step 71 [12/2019 - 10/2022] , or refer to PROCEDURE - Step 69 [10/2022 - ]