Removal [12/2019 - 11/2023]: Procedure
- REMOVE FRONT DOOR SCUFF PLATE RH
HINT:
Use the same procedure as for the LH side.
Refer to PROCEDURE - Step 9 [12/2019 - 10/2022] , or refer to PROCEDURE - Step 9 [10/2022 - ]
- REMOVE COWL SIDE TRIM SUB-ASSEMBLY RH
HINT:
Use the same procedure as for the LH side.
Refer to PROCEDURE - Step 10 [12/2019 - 10/2022] , or refer to PROCEDURE - Step 10 [10/2022 - ]
- DISCONNECT FRONT DOOR OPENING TRIM WEATHERSTRIP RH
Refer to PROCEDURE - Step 29 [12/2019 - 10/2022] , or refer to PROCEDURE - Step 28 [10/2022 - 11/2023]
- REMOVE INSTRUMENT PANEL FINISH END PANEL RH
Refer to PROCEDURE - Step 30 [12/2019 - 10/2022] , or refer to PROCEDURE - Step 29 [10/2022 - 11/2023]
- REMOVE NO. 2 INSTRUMENT PANEL UNDER COVER SUB-ASSEMBLY
Refer to PROCEDURE - Step 31 [12/2019 - 10/2022] , or refer to PROCEDURE - Step 30 [10/2022 - 11/2023]
- REMOVE LOWER INSTRUMENT PANEL SUB-ASSEMBLY
Refer to PROCEDURE - Step 32 [12/2019 - 10/2022] , or refer to PROCEDURE - Step 31 [10/2022 - 11/2023]
- REMOVE ECU INTEGRATION BOX RH
Refer to PROCEDURE - Step 7
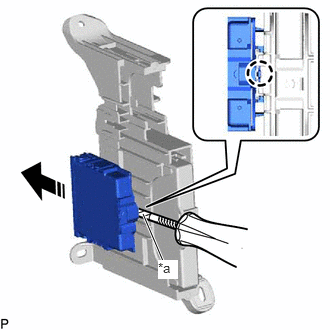
- REMOVE CLEARANCE WARNING ECU ASSEMBLY
- Using a screwdriver with its tip wrapped with protective tape, disengage the claw and remove the clearance warning ECU assembly as shown in the illustration.
*a Protective Tape 
Remove in this Direction NOTE:- If the ECU integration box is deformed or damaged, replace it.
- Do not bend the claw more than necessary.
- Using a screwdriver with its tip wrapped with protective tape, disengage the claw and remove the clearance warning ECU assembly as shown in the illustration.