Removal [12/2019 - ]: Procedure
- REMOVE REAR NO. 2 SEAT ASSEMBLY
Refer to REMOVAL [12/2019 - ]
- REMOVE REAR FLOOR FINISH PLATE
Refer to PROCEDURE - Step 7 [12/2019 - 10/2022] , or refer to PROCEDURE - Step 7 [10/2022 - ]
- REMOVE REAR OUTER SEAT TRACK BRACKET COVER
Refer to PROCEDURE - Step 13 [12/2019 - 10/2022] , or refer to PROCEDURE - Step 13 [10/2022 - ]
- REMOVE REAR DOOR SCUFF PLATE
Refer to PROCEDURE - Step 14 [12/2019 - 10/2022] , or refer to PROCEDURE - Step 14 [10/2022 - ]
- DISCONNECT REAR DOOR OPENING TRIM WEATHERSTRIP
Refer to PROCEDURE - Step 11 [12/2019 - 10/2021] , or refer to PROCEDURE - Step 11 [10/2021 - 10/2022] , or refer to PROCEDURE - Step 11 [10/2022 - 11/2023] , or refer to PROCEDURE - Step 11 [11/2023 - ]
- REMOVE FRONT DECK SIDE TRIM COVER LH (for LH Side)
Refer to PROCEDURE - Step 31 [12/2019 - 10/2022] , or refer to PROCEDURE - Step 31 [10/2022 - ]
- REMOVE FRONT DECK SIDE TRIM COVER RH (for RH Side)
Refer to PROCEDURE - Step 41 [12/2019 - 10/2022] , or refer to PROCEDURE - Step 41 [10/2022 - ]
- DISCONNECT REAR SEAT OUTER BELT ASSEMBLY
Refer to PROCEDURE - Step 14 [12/2019 - 10/2021] , or refer to PROCEDURE - Step 14 [10/2021 - 10/2022] , or refer to PROCEDURE - Step 14 [10/2022 - 11/2023] , or refer to PROCEDURE - Step 14 [11/2023 - ]
- REMOVE NO. 2 DECK SIDE TRIM COVER
Refer to PROCEDURE - Step 33 [12/2019 - 10/2022] , or refer to PROCEDURE - Step 33 [10/2022 - ]
- DISCONNECT REAR NO. 2 SEAT OUTER BELT ASSEMBLY
Refer to PROCEDURE - Step 16
- REMOVE DECK TRIM POCKET COVER
Refer to PROCEDURE - Step 35 [12/2019 - 10/2022] , or refer to PROCEDURE - Step 35 [10/2022 - ]
- REMOVE NO. 1 LUGGAGE COMPARTMENT TRIM HOOK
Refer to PROCEDURE - Step 36 [12/2019 - 10/2022] , or refer to PROCEDURE - Step 36 [10/2022 - ]
- REMOVE ROPE HOOK
Refer to PROCEDURE - Step 37 [12/2019 - 10/2022] , or refer to PROCEDURE - Step 37 [10/2022 - ]
- REMOVE DECK TRIM SIDE PANEL ASSEMBLY LH (for LH Side)
Refer to PROCEDURE - Step 38 [12/2019 - 10/2022] , or refer to PROCEDURE - Step 38 [10/2022 - ]
- REMOVE COOLER (NO. 2 ROOM TEMP. SENSOR) THERMISTOR (for RH Side)
w/ Rear Automatic Air Conditioning System: Refer to PROCEDURE - Step 1 [12/2019 - 11/2023] , or refer to PROCEDURE - Step 1 [11/2023 - ]
- REMOVE DECK TRIM SIDE PANEL ASSEMBLY RH (for RH Side)
Refer to PROCEDURE - Step 49 [12/2019 - 10/2022] , or refer to PROCEDURE - Step 49 [10/2022 - ]
- REMOVE QUARTER PILLAR GARNISH
Refer to PROCEDURE - Step 39 [12/2019 - 10/2022] , or refer to PROCEDURE - Step 39 [10/2022 - ]
- REMOVE INNER ROOF SIDE GARNISH ASSEMBLY
Refer to PROCEDURE - Step 40 [12/2019 - 10/2022] , or refer to PROCEDURE - Step 40 [10/2022 - ]
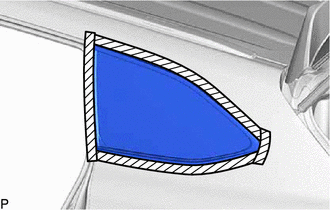
- REMOVE QUARTER WINDOW ASSEMBLY
- Apply protective tape to the area around the installation position of the quarter window assembly on the vehicle body to prevent it from being scratched.

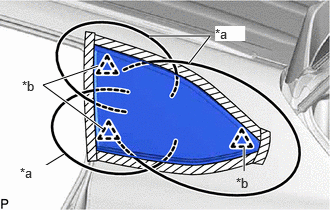
Protective Tape - Pass a piano wire between the vehicle body and quarter window assembly from the interior.
*a Piano Wire *b Clip - Tie both wire ends to wooden blocks or similar objects that can serve as handles.
- Cut the adhesive by pulling the piano wire around the quarter window assembly.NOTE:
When separating the quarter window assembly, be careful not to damage the paint or interior and exterior ornaments.
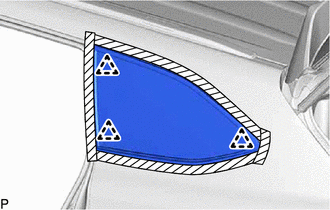
- Using suction cups, disengage the 3 clips and remove the quarter window assembly.NOTE:
Be careful not to drop the quarter window assembly.
- Apply protective tape to the area around the installation position of the quarter window assembly on the vehicle body to prevent it from being scratched.
- CLEAN VEHICLE BODY
- Clean and shape the contact surfaces of the vehicle body.
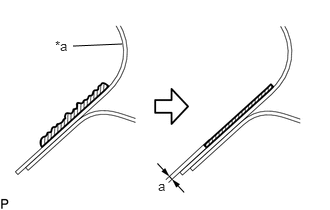
- Using a knife, cut off any excess adhesive on the contact surfaces of the vehicle body as shown in the illustration.
*a Vehicle Body Adhesive Standard Dimension
Area Dimension a 1.0 mm (0.0394 in.) or more NOTE:Be careful not to damage the vehicle body.
HINT:
Leave approximately 1.0 mm (0.0394 in.) of adhesive on the vehicle body.
- Using a knife, cut off any excess adhesive on the contact surfaces of the vehicle body as shown in the illustration.
- Clean the contact surfaces of the vehicle body with a piece of cloth saturated with non-residue solvent.
HINT:
Even if all of the adhesive has been removed, clean the vehicle body.
- Clean and shape the contact surfaces of the vehicle body.