Installation [12/2019 - ]: Procedure
- INSTALL QUARTER WINDOW ASSEMBLY
- Using a brush or sponge, coat the adhesive application area of a new quarter window assembly with glass primer.
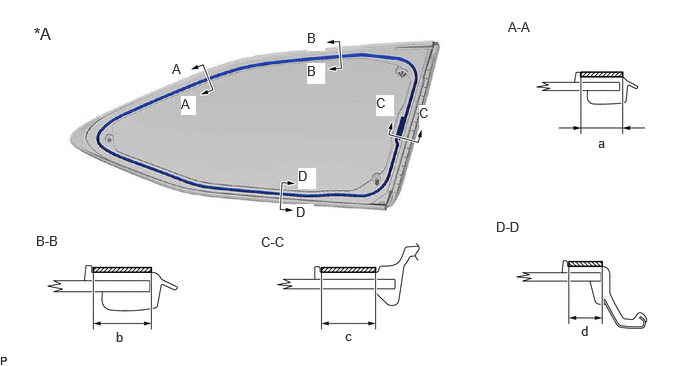
*A Back Side - - 
Glass Primer - - Standard Dimension
Area Dimension Area Dimension a 17.3 mm (0.681 in.) or more b 17.7 mm (0.697 in.) or more c 20.0 mm (0.787 in.) or more d 13.7 mm (0.539 in.) or more NOTE:- Do not apply too much glass primer.
- Allow the glass primer to dry for 3 minutes or more.
- Throw away any leftover glass primer.
HINT:
If an area other than specified is coated by accident, wipe off the glass primer with a clean piece of cloth before it dries.
- Apply adhesive to the quarter window assembly.
Adhesive
Toyota Genuine Windshield Glass Adhesive or equivalent
- Cut off the tip of the cartridge nozzle as shown in the illustration.
*a Nozzle Standard Dimension
Area Dimension a 8.0 to 11.0 mm (0.315 to 0.433 in.) b 6.0 to 9.0 mm (0.236 to 0.354 in.) - Load the sealer gun with the cartridge.
- Apply adhesive to the quarter window assembly as shown in the illustration.
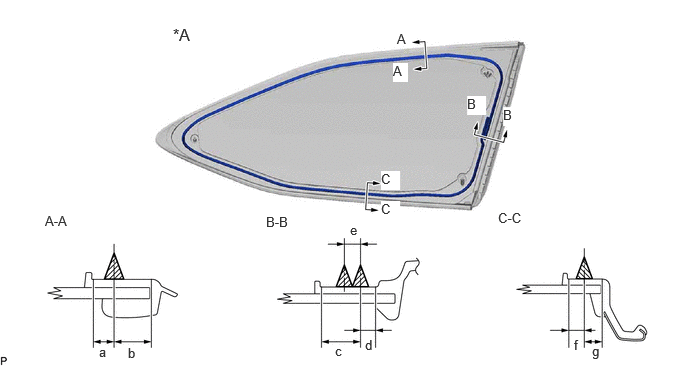
*A Back Side - - Adhesive - - Standard Dimension
Area Dimension Area Dimension a 6.3 mm (0.248 in.) b 11.4 mm (0.449 in.) c 14.4 mm (0.567 in.) d 5.6 mm (0.220 in.) e 6.0 mm (0.236 in.) f 6.3 mm (0.248 in.) g 7.4 mm (0.291 in.) - -
- Cut off the tip of the cartridge nozzle as shown in the illustration.
- Install the quarter window assembly to the vehicle body.
- Using suction cups, engage the 3 clips to install the quarter window assembly.NOTE:
- Check that the clips are engaged to the vehicle body correctly.
- Check the clearance between the vehicle body and quarter window assembly.
- Lightly press the outer surface of the quarter window assembly to ensure that the quarter window assembly is securely fit to the vehicle body.
HINT:
Press the glass with a force of 98 N (10 kgf, 22.0 lbf) or more.
- Using a scraper, remove any excess or protruding adhesive.
- Hold the quarter window assembly using protective tape until the applied adhesive becomes hard.
HINT:
Follow the instructions supplied by the adhesive manufacturer or in the corresponding instruction manual for the minimum amount of time necessary to wait before driving the vehicle.
- Using suction cups, engage the 3 clips to install the quarter window assembly.
- Using a brush or sponge, coat the adhesive application area of a new quarter window assembly with glass primer.
- INSPECT FOR LEAK
- After the adhesive has hardened, apply water from the outside of the vehicle. Check that no water leaks into the cabin.
- If water leaks into the cabin, allow the water to dry and add adhesive.
- Remove the protective tape.
- INSTALL INNER ROOF SIDE GARNISH ASSEMBLY
Refer to PROCEDURE - Step 21 [12/2019 - 10/2022] , or refer to PROCEDURE - Step 19 [10/2022 - ]
- INSTALL QUARTER PILLAR GARNISH
Refer to PROCEDURE - Step 22 [12/2019 - 10/2022] , or refer to PROCEDURE - Step 20 [10/2022 - ]
- INSTALL DECK TRIM SIDE PANEL ASSEMBLY RH (for RH Side)
Refer to PROCEDURE - Step 33 [12/2019 - 10/2022] , or refer to PROCEDURE - Step 31 [10/2022 - ]
- INSTALL COOLER (NO. 2 ROOM TEMP. SENSOR) THERMISTOR (for RH Side)
w/ Rear Automatic Air Conditioning System: Refer to PROCEDURE - Step 1 [12/2019 - 11/2023] , or refer to PROCEDURE - Step 1 [11/2023 - ]
- INSTALL DECK TRIM SIDE PANEL ASSEMBLY LH (for LH Side)
Refer to PROCEDURE - Step 23 [12/2019 - 10/2022] , or refer to PROCEDURE - Step 21 [10/2022 - ]
- INSTALL ROPE HOOK
Refer to PROCEDURE - Step 24 [12/2019 - 10/2022] , or refer to PROCEDURE - Step 22 [10/2022 - ]
- INSTALL NO. 1 LUGGAGE COMPARTMENT TRIM HOOK
Refer to PROCEDURE - Step 25 [12/2019 - 10/2022] , or refer to PROCEDURE - Step 23 [10/2022 - ]
- INSTALL DECK TRIM POCKET COVER
Refer to PROCEDURE - Step 26 [12/2019 - 10/2022] , or refer to PROCEDURE - Step 24 [10/2022 - ]
- CONNECT REAR NO. 2 SEAT OUTER BELT ASSEMBLY
Refer to PROCEDURE - Step 9
- INSTALL NO. 2 DECK SIDE TRIM COVER
Refer to PROCEDURE - Step 28 [12/2019 - 10/2022] , or refer to PROCEDURE - Step 26 [10/2022 - ]
- CONNECT REAR SEAT OUTER BELT ASSEMBLY
Refer to PROCEDURE - Step 11 [12/2019 - 10/2021] , or refer to PROCEDURE - Step 11 [10/2021 - ]
- INSTALL FRONT DECK SIDE TRIM COVER RH (for RH Side)
Refer to PROCEDURE - Step 41 [12/2019 - 10/2022] , or refer to PROCEDURE - Step 39 [10/2022 - ]
- INSTALL FRONT DECK SIDE TRIM COVER LH (for LH Side)
Refer to PROCEDURE - Step 30 [12/2019 - 10/2022] , or refer to PROCEDURE - Step 28 [10/2022 - ]
- CONNECT REAR DOOR OPENING TRIM WEATHERSTRIP
Refer to PROCEDURE - Step 14 [12/2019 - 10/2021] , or refer to PROCEDURE - Step 14 [10/2021 - ]
- INSTALL REAR DOOR SCUFF PLATE
Refer to PROCEDURE - Step 47 [12/2019 - 10/2022] , or refer to PROCEDURE - Step 45 [10/2022 - ]
- INSTALL REAR OUTER SEAT TRACK BRACKET COVER
Refer to PROCEDURE - Step 48 [12/2019 - 10/2022] , or refer to PROCEDURE - Step 46 [10/2022 - ]
- INSTALL REAR FLOOR FINISH PLATE
Refer to PROCEDURE - Step 65 [12/2019 - 10/2022] , or refer to PROCEDURE - Step 63 [10/2022 - ]
- INSTALL REAR NO. 2 SEAT ASSEMBLY
Refer to INSTALLATION [12/2019 - ]