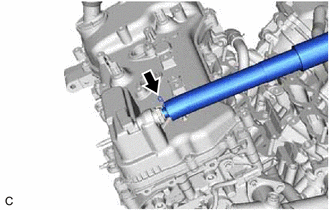
- REMOVE KNOCK CONTROL SENSOR
Refer to REMOVAL [12/2019 - 10/2022]
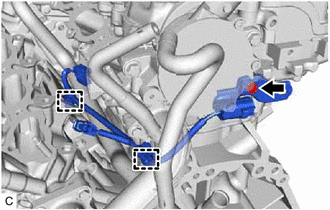
- REMOVE SENSOR WIRE
- Disengage the 2 clamps and remove the bolt and sensor wire.
 Courtesy of © TOYOTA, LICENSE AGREEMENT TMS1002 Courtesy of © TOYOTA, LICENSE AGREEMENT TMS1002
|
- REMOVE IGNITION COIL ASSEMBLY
Refer to PROCEDURE - Step 2
- REMOVE VACUUM PUMP ASSEMBLY
Refer to PROCEDURE - Step 11
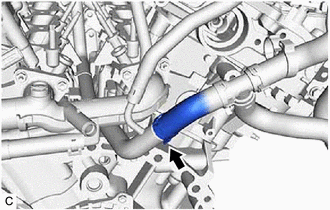
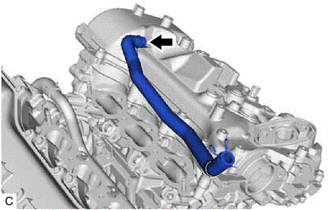
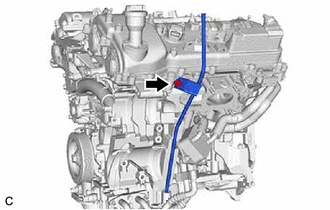
- REMOVE WATER BY-PASS HOSE ASSEMBLY
- Slide the clip and remove the water by-pass hose assembly from the water inlet pipe.
 Courtesy of © TOYOTA, LICENSE AGREEMENT TMS1002 Courtesy of © TOYOTA, LICENSE AGREEMENT TMS1002
|
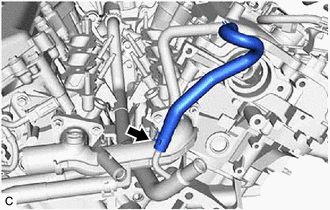
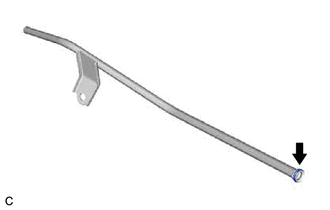
- REMOVE NO. 3 WATER BY-PASS HOSE
- Slide the clip and remove the No. 3 water by-pass hose from the water inlet pipe.
 Courtesy of © TOYOTA, LICENSE AGREEMENT TMS1002 Courtesy of © TOYOTA, LICENSE AGREEMENT TMS1002
|
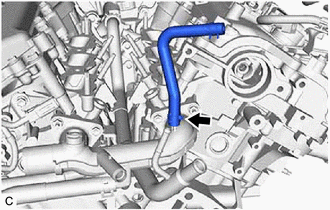
- REMOVE NO. 2 WATER BY-PASS HOSE
- Slide the clip and remove the No. 2 water by-pass hose from the water outlet.
 Courtesy of © TOYOTA, LICENSE AGREEMENT TMS1002 Courtesy of © TOYOTA, LICENSE AGREEMENT TMS1002
|
- REMOVE VENTILATION HOSE
 Courtesy of © TOYOTA, LICENSE AGREEMENT TMS1002 Courtesy of © TOYOTA, LICENSE AGREEMENT TMS1002
|
Slide the clip and remove the ventilation hose from the PCV valve (ventilation valve sub-assembly).
- REMOVE NO. 2 VENTILATION HOSE
- Slide the clip and remove the No. 2 ventilation hose from the cylinder head cover sub-assembly.
 Courtesy of © TOYOTA, LICENSE AGREEMENT TMS1002 Courtesy of © TOYOTA, LICENSE AGREEMENT TMS1002
|
- REMOVE V-RIBBED BELT
Refer to PROCEDURE - Step 3
- REMOVE GENERATOR ASSEMBLY
Refer to PROCEDURE - Step 4
- REMOVE COMPRESSOR AND MAGNETIC CLUTCH
Refer to PROCEDURE - Step 6
- REMOVE NO. 1 COMPRESSOR MOUNTING BRACKET
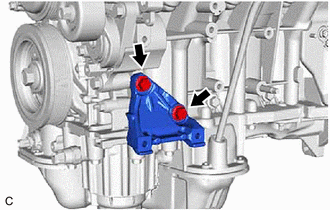 Courtesy of © TOYOTA, LICENSE AGREEMENT TMS1002 Courtesy of © TOYOTA, LICENSE AGREEMENT TMS1002
|
Remove the 2 bolts and No. 1 compressor mounting bracket from the cylinder block sub-assembly.
- REMOVE NO. 2 IDLER PULLEY SUB-ASSEMBLY
Refer to PROCEDURE - Step 3
- REMOVE V-RIBBED BELT TENSIONER ASSEMBLY
- Remove the 2 bolts and V-ribbed belt tensioner assembly.
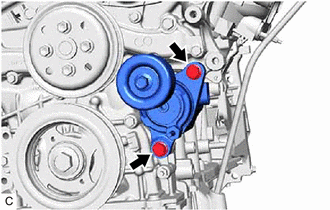 Courtesy of © TOYOTA, LICENSE AGREEMENT TMS1002 Courtesy of © TOYOTA, LICENSE AGREEMENT TMS1002
|
- REMOVE WATER PUMP PULLEY
Refer to PROCEDURE - Step 4
- REMOVE ENGINE OIL LEVEL DIPSTICK GUIDE
- Remove the engine oil level dipstick from the engine oil level dipstick guide.
- Remove the bolt and engine oil level dipstick guide from the camshaft housing sub-assembly LH and oil pan sub-assembly.
 Courtesy of © TOYOTA, LICENSE AGREEMENT TMS1002 Courtesy of © TOYOTA, LICENSE AGREEMENT TMS1002
|
- Remove the engine oil level dipstick guide O-ring from the engine oil level dipstick guide.
 Courtesy of © TOYOTA, LICENSE AGREEMENT TMS1002 Courtesy of © TOYOTA, LICENSE AGREEMENT TMS1002
|
- REMOVE NO. 5 CYLINDER BLOCK INSULATOR
- Remove the No. 5 cylinder block insulator from the engine assembly.
 Courtesy of © TOYOTA, LICENSE AGREEMENT TMS1002 Courtesy of © TOYOTA, LICENSE AGREEMENT TMS1002
|
- REMOVE DRIVE SHAFT BEARING BRACKET
- Remove the 3 bolts and drive shaft bearing bracket from the cylinder block sub-assembly.
 Courtesy of © TOYOTA, LICENSE AGREEMENT TMS1002 Courtesy of © TOYOTA, LICENSE AGREEMENT TMS1002
|
- REMOVE WIRE HARNESS CLAMP BRACKET
- Remove the bolt and wire harness clamp bracket from the camshaft housing sub-assembly LH.
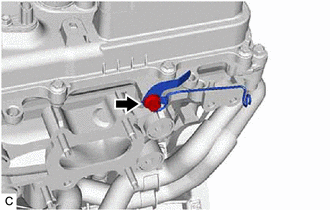 Courtesy of © TOYOTA, LICENSE AGREEMENT TMS1002 Courtesy of © TOYOTA, LICENSE AGREEMENT TMS1002
|
- Remove the bolt and wire harness clamp bracket from the camshaft housing sub-assembly.
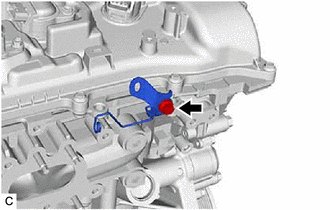 Courtesy of © TOYOTA, LICENSE AGREEMENT TMS1002 Courtesy of © TOYOTA, LICENSE AGREEMENT TMS1002
|
- REMOVE WATER FILLER BRACKET
- Remove the 2 bolts and water filler bracket from the camshaft housing sub-assembly LH.
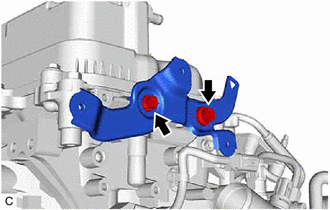 Courtesy of © TOYOTA, LICENSE AGREEMENT TMS1002 Courtesy of © TOYOTA, LICENSE AGREEMENT TMS1002
|